Create An Author Website For Free Using Wix
This week’s guest post by author Jules Fier underlines the importance of creating an author website and gives you a step-by-step guide to creating one using Wix. As the guide had been made for the layperson, everyone can easily follow it: there is no programming knowledge needed.
Importance of an author website
There is less and less spoken about the importance of an author website. With social media (Twitter, but mostly Facebook) available for everyone, Amazon and Google Play offering author pages, and GoodReads making it possible to interact with readers directly, author websites have somewhat become less interesting.
But not rightly so.
Jane Friedman has written a great article on the importance of still keeping an independent author website, outside of social media. Her reasoning includes keeping your independence (as much as it is possible) and be in control of your content and layout. Another important point is for search engines: it is unlikely that your Facebook author page would rank as highly on Google as your website.
Main purposes of an author website
Before you start creating your website, sit down and think about the primary goals you would like to achieve with your site. It is possible that your author website will be the first (or only) thing an agent, publisher or readers see about you. Would you like to put yourself (your personality, your journey) in the center or your books?
Goals often include:
- Showcase you as a “brand” and summarizing all your activities on one page
- Offer the first impression to agents, publishers, and readers
- Run a blog
- Start a newsletter
- Share book-related extra information (including pictures and videos)
- Sell your books
- Interact with your readers and followers directly
Depending on where you are in your publishing journey and what your plans are, your goals with the website could be entirely different.
In the following, our guest author Jules Fier will share his experience creating an author website using Wix.
About the author (Jules Fier)
Just a person who has traveled the world and also into the horror genre (but still actually love other ones too). I grew up reading horror fiction written by the original masters of teen horror like Lois Duncan, R.L. Stine, Christopher Pike, as well as other authors of teen horror, and of course the more adult-oriented ones like Bentley Little, Brian Lumley, Gary Brandner, Clive Barker, and all the rest of them.
My book What Happened Last Halloween Night is a young adult horror fiction that’s highly inspired by Jack Willamson’s Darker Than You Think. I also have a teen horror series called Witch’s Street and confess that my idea to write the series comes from teenage years (and even today) of having grown up reading R.L. Stine’s Fear Street. I always wanted to write my own teen horror series, and I am pretty much a big fan of horror TV anthologies. The only difference between my series and Fear Street is location and geography, as it is set in the UK rather than the US.
A step-by-step guide to creating an author website using Wix
The start
I wrote this article, to tell you, the other authors out there, how I managed to create a free Wix simple author website for myself, and how you too can create one for yourself.
For the record, I, myself, am just a layperson. It took me weeks to learn to master making a website for myself in Wix. Take it from me; if you are a layperson and not some high-tech whiz kid, you’re better off with Wix than WordPress. I have a WordPress account, but making a free website for my books in WordPress was just causing me too much hassle and headache.
Now let’s not waste time and just get on with it (earlier you start, earlier you guys and gals can go out for beer or wine or whatever it is that you do to chill out!!!)
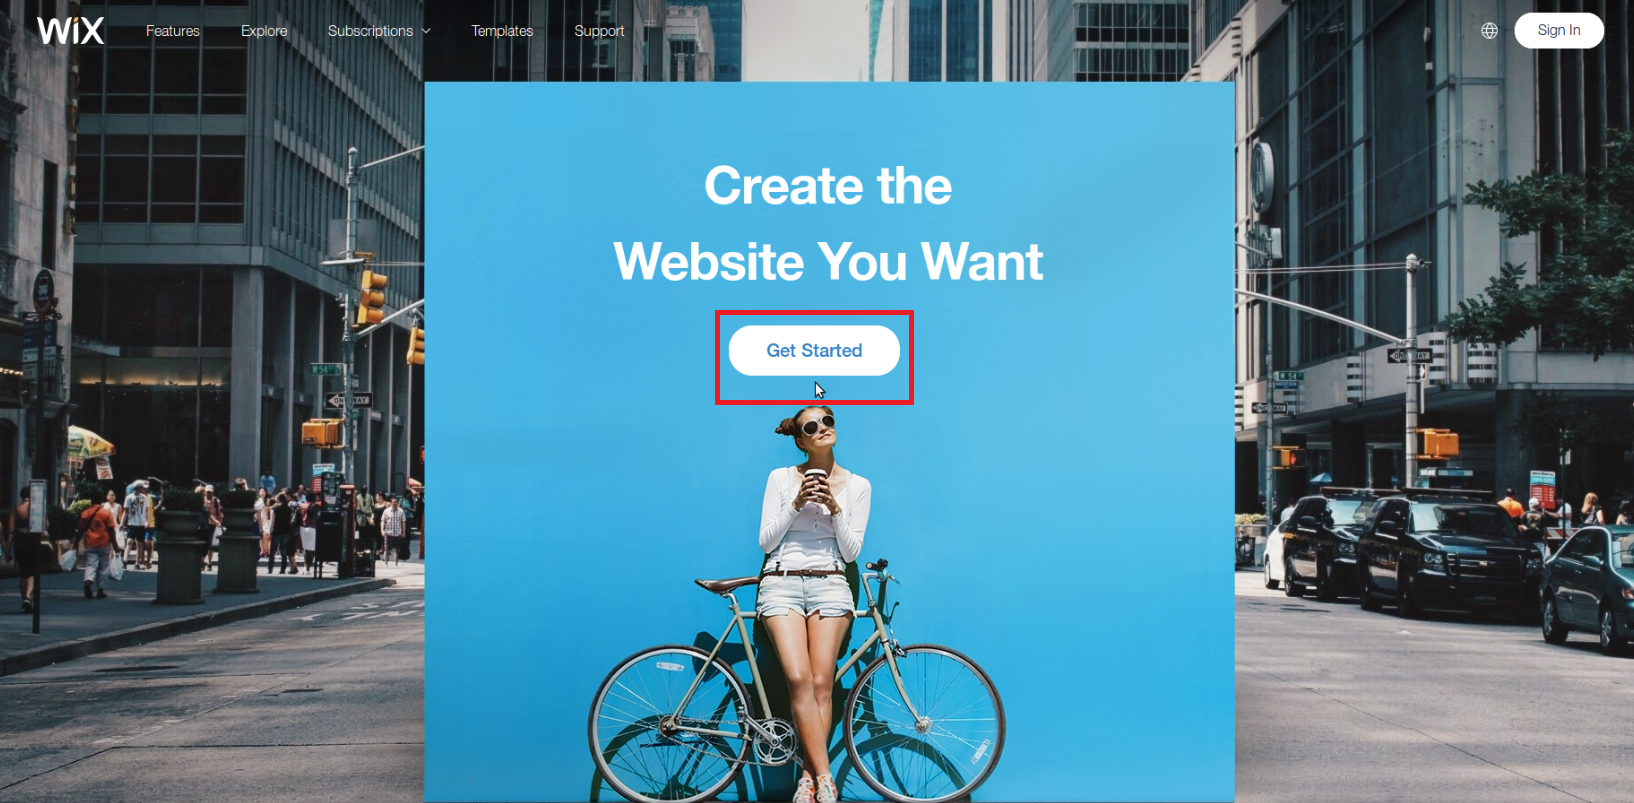
Wix offers a free version and/or free plan. Assuming you don’t already have an account in Wix, you first type in www.wix.com in the URL bar. Once you are there, just click the Get Started button above the young woman leaning against her bicycle.
When you are in the log in page, you create a Wix account for yourself, but if you’ve got Facebook or Gmail, you can already start signing in, though don’t forget to uncheck the Remember Me box, if you don’t want to always be automatically logged in, each time you sign in.
As I already have a Wix account, it is not easy for me to get back to the page that comes after the Log-In page, the second time. When you log in for the first time, you will be in a page divided into two. The first half would be Wix asking you how they can help you create your website. The second right-half shows Wix Templates. As I am here to guide you, just click on Templates. Once you click on Template, you will be taken to the Template page. When you are on the Template page, the middle of the page will show you different templates for different things. But to your far left corner, would be the Categories. Go to Categories, scroll down and click on Creative Arts.
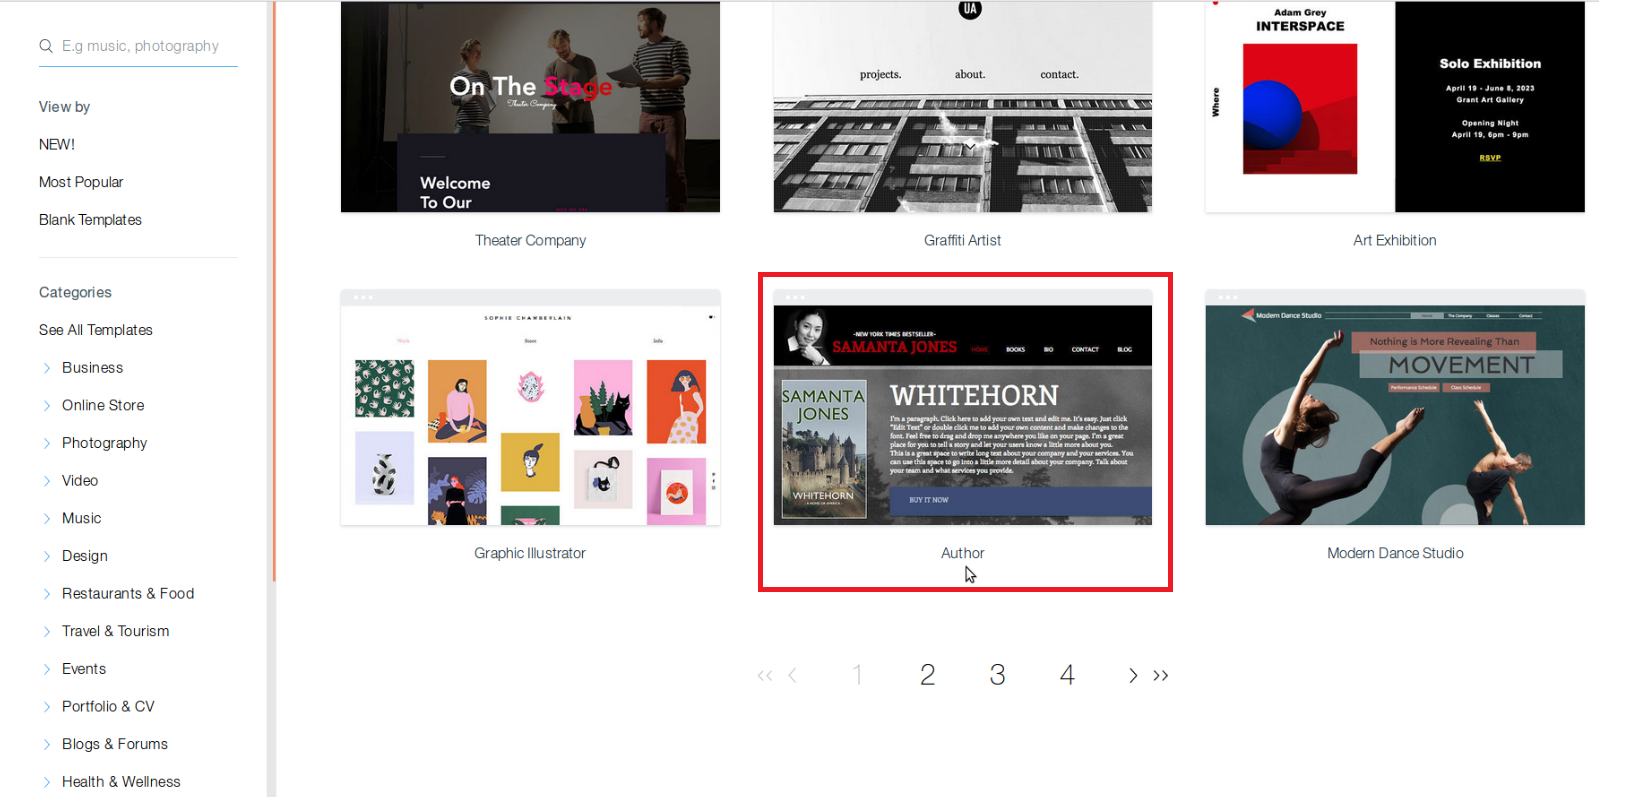
When you are in the Creative Arts page, scroll down the page until you find the Template for Author, i.e., the one with the picture of Samantha Jones and her novel Whitehorn.
Hover your cursor on the Author Template and click on Edit.
Personalize the book page
As you can see this template is an example of what a simple author looks like. You can see the author’s name and photo, a book of hers, the book’s synopsis, the Buy Button, as well as the 6 page-headings of that website-template.
Go to where the page headings are, and click once. Click on Manage Menu. The Site Menu rectangular box appears to the left. Now let’s say we want to go to the Books page within that website template. You click on Books within the menu.
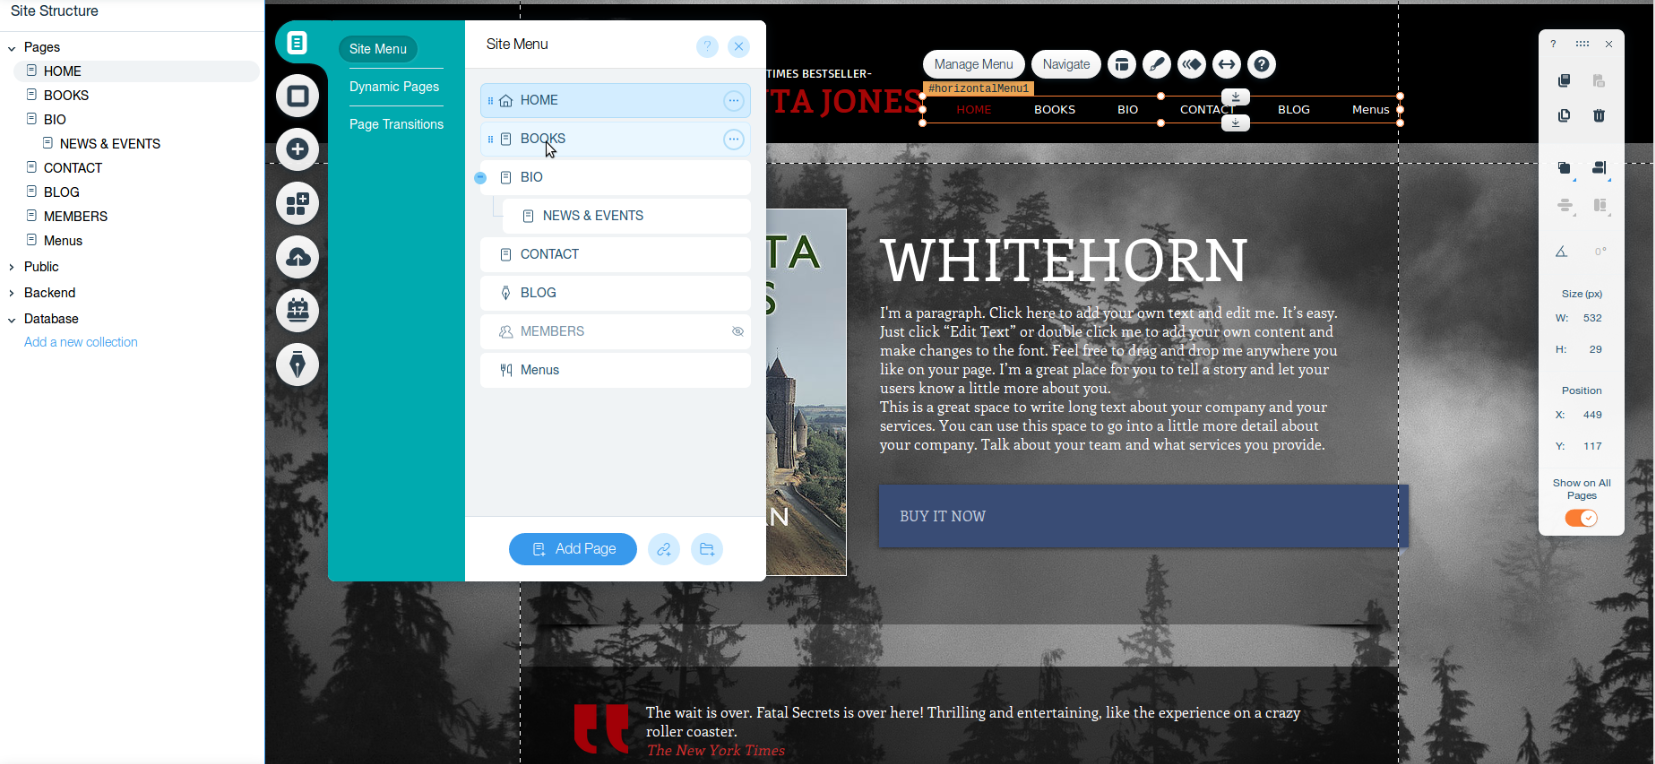
Now we are at the Books page and can see what it looks like. Don’t forget to click X on the Site Menu box, so that we can have a better look at the Books page.
Now here is where we would like to replace Samantha Jones’ book texts and her book image with our own. To replace the words Whitehorn and the rest of her own text, next to her book, we first click on the text words. We click on Edit Text. Now we see all the text words highlighted in orange. We also see the Text Settings box appear over the book image.
With the cursor, you click a couple of times, until you can control the cursor to only highlight the smaller text. You can change the word size of the text by going to the Font Size inside Text Settings. You can also change the color of your text. Also just to remind you, that you can drag-and-drop images, texts, and buttons around, just by holding you click on any of them.
Add your cover image
Now, as for putting up the image of our own book, replacing the current book image of Samantha Jones’s Whitehorn, we first hover the cursor on her book and click once. Now we can see the bubble for Change Image appear above her book image. We click on Change Image. Now the Choose an Image box appears. As we can see, my own book cover images are already on display. But if we want to use an image that is not here, we need to upload it. To upload an image from your computer, go to the orange Upload Image button to the top right.
Once the image that we would want to use is inside this Choose an Image box, to use it, all we need to do is click on it once. Once clicked, the check sign would appear on that book image itself, indicating it is going to be the one chosen. All we do now is click on the blue Choose Image button on the far right down corner.
If the image doesn’t fit perfectly, we go to the thin rectangular tool box on our right and go to where it says H (height). To adjust our own book image to look more perfect and even, we click on the H bar, and keep typing in digits until we can see which one makes our book image cover look just right.
And voila, the book cover image looks much better now (actually we can make it look even better, but I am just giving you the gist, and you already can understand how to adjust the book image, to look in whatever form we would want it to look).
Add your name and photo
Also a reminder that it is best to replace Samantha Jones’s name with your author pen name. So we click once on the name. The bubble with the words Edit Text appears. The same also applies to her photo, which we can replace.
Buy button
Now we have the Buy Button. You are probably wondering how you can manipulate the Buy Button, in terms of people clicking on it, hence, linking the buy button to your book. To start linking the Buy button to your book, we first click on it. The Button Settings box appears. In the Button Settings bar, we can change the name of the button, replacing it with something like Buy It On Amazon (because your book may be available in more than one online store and we want a button, just for the Amazon location of your book).
And we click on the small blue link-sign on the down right corner of the Button Settings box. We now have the What Do You Want To Link To box appear. On the bar below the words What’s the Web Address URL? , we type in the Amazon URL for your book.
And if you have more than one bookstore for your book, you would, of course, need more than one Buy Button. So what you do is right-click on the Buy Button, and click the word Duplicate.
Book series
Now let us head to the Book page. Earlier on the Home page, we learned how to change the cover image, the text, and reconfigure the Buy Button. But let’s say that you have a book series, i.e. Fear Street.
First, we just stick being here in the Book page. We click down below on Site Menu’s blue Add page button: we have created a new page. You can rename the new page, and give it your book series’s name/title.
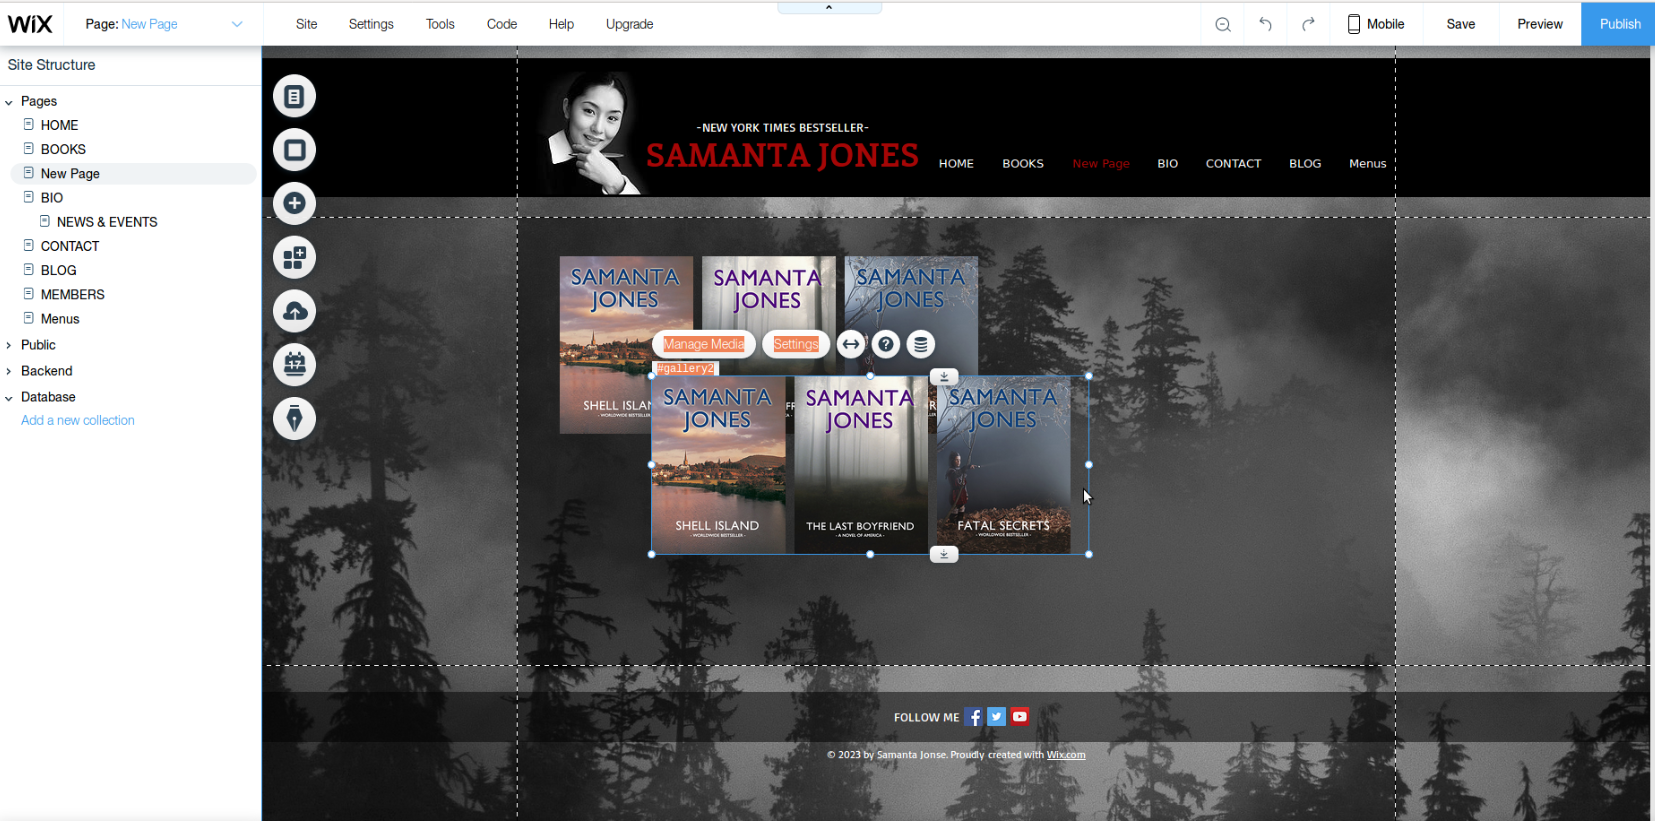
On the same line as the New page, we click the 3 dotted button, and then scroll down and click on Subpage, turning this New page a subheading/subpage within the Books page. Now that we have a subpage for your book series, it would be a good idea to go back to the Home page and scroll down, where we can see an attached series of books. Since we have an idea of how we can change the image of all these books, what we can do first is click on the image of these attached books. And then right-click on them, so that we can copy them. Then we go back to our New Pag, right-click and then paste them.
You can do the same with the Buy Button. Just go back to the Home page, copy the Buy Button, then paste it on the New page.
Social media
Now, there is the question of linking your new Wix site to your Social Media accounts. We go back to Home page, scroll down to the bottom. Look at the logos next to the words Follow Me. Click on the social media symbols. The Set Social Links bubble appears. On the screen, we can see only 3 Social Media images (Facebook, Twitter, and YouTube). Before I tell you how to link each of them to your Social Media, let say that you have an Instagram account. To add a Social Media link that isn’t present here, click at the small orange Add Icons on the top right.
To link the icon to your social media account, click on the link image. The What do you want to link to? box appears. Enter your social media URL. Just repeat the process with all of your accounts.
Also if you want to get rid of or delete any of the Social Media symbols/links, all you got to do, is hover your cursor over that particular Social Media symbol that you want to be rid of, and click on the garbage symbol.
Author bio
Now let’s head to the Bio page. It would be best to replace Samantha Jones’ photo and bio with your own. You already know how to change the image or edit text.
Contact page
Now let’s head to the Contact page since you are probably asking me now how we can let people contact you on your Wix site.
We should click on the Let’s talk, then click the Edit text bubble, to change things and replace it with what you would want to say. Now, let’s go to the Contact Form, to see if it works and to let you know how it works. First, we click on the Contact Form.
Now we see the Manage Fields bubble and other small icons appear over the Contact Form. Click on the small icon for Settings.
You will receive any messages sent to you on the Contact Form on your own email address. If we go further down, we see what the senders will see on their screens, once they’ve sent you a message.
Homepage
Let’s head back to the Homepage, and look at all the original headings. We’ve got 6 of them: Home, Books, Bio, Contact, Blog, and Menu. We have already checked the pages for Home, Books, Bio and Contact. We have not yet checked Blog and Menu.
If we click on the Manage Menu bubble, we learn that it contains a food menu. This is something we should get rid of unless you are planning on opening up an online restaurant while selling your books. To delete the Menu heading and page from your Wix website, all we have to do is bring back the Site Menu box, click on Menu, then click on the 3 dots button on Menu’s far right end, and then click Delete.

Blog
Let’s now go check out the Blog. As you can see, there are already different sample posts here. Unlike Menu, we would like to keep Blog (but not the sample posts). Just delete the sample posts, so you can start again.
Background
You can also change the background of any page. All you have to do is go to the icon for Background and click.
The page Background box appears to your left, and within, the Selected Backgrounds box. You have a variety of images you can pick to become your page background. To make one of them you background, hover your cursor over it, and click.
You can also upload an image, a photo, pictures or even a video. All you have to do is go to the icons to your left, look for the icon that says My Uploads.
Now, let’s head back to Homepage. If you want to create a Website Banner for free, you can go to Canva. You can sign up with an email, or even a Gmail or Facebook account.
When we are satisfied with our changes, it would be best to click on Save.
Mobile version
Now just to remind you that so far everything that we have done, was in the desktop version. We should also check the mobile app version for our new Wix website. So let’s click on where it says Mobile.
We click Edit Mobile View.
So here we are looking at what my own Wix website looks like on Mobile view. A lot of readers/buyers look at author websites on their mobile phones, and this is what my Wix website looks to them.
On top of the mobile screen version, we see 3 small lines on the right. For people viewing on their mobile devices, this is how navigate from one page to another. For us, who are editing, this is how we also go from one page to another.
Publish
Now, just to remind you that this author website does not yet officially exist. We have to click on ‘Publish’.
A box will appear, showing the Site Name and Site Address. You can give it whatever Site Name and Site Address you want.
Your job does not end here. You have to start thinking about how people are going to find you and your author website. A great way would be to add SEO Keywords on your Wix website. You can check this video out for that information.